03 / AI REPO RADAR
dzhng/jevgrep
2,769 starsLicense: MITLast push: On the radar:
A CLI for coding agents that finds code by describing what it does, returning relevant files, reading leads and verbatim source excerpts.
What Jevgrep is and the problem it addresses
Jevgrep is a command-line tool for coding agents, with jg as its main command. The README slogan promises the same intelligence at roughly 30% lower cost, and its core idea is summed up as: find code by asking what it does. According to the edition metadata, the repository has 2769 stars and uses the MIT license.
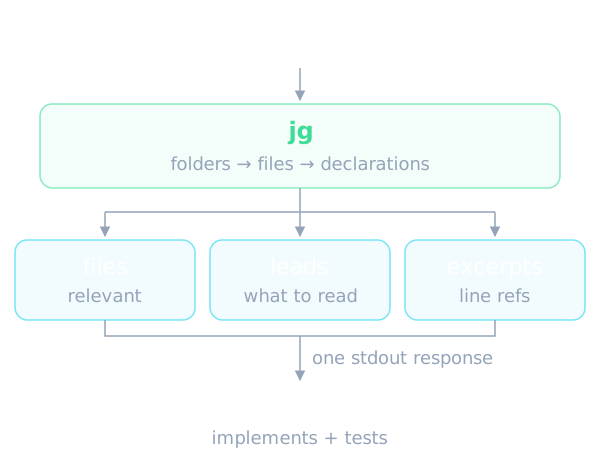
The problem the README describes is very practical. Every time a coding agent works in an unfamiliar repository, part of its effort goes into finding the right files to read. Jevgrep gives the agent a place to start: you ask a repository question, and jg returns relevant files, reading leads and verbatim source excerpts in one stdout response. Implementing and testing the change stays with your own coding agent.
To judge relevance the tool uses Jev, which assesses relevance across folders, files and declarations. The README is also candid about scope: if you already know the exact symbol or path, a direct read or an rg search may be all you need, and Jevgrep is most useful for questions that span unfamiliar files.
How it works
According to the README, Jevgrep explores the repository hierarchy and follows qualifying branches. It selects files using content previews, then identifies useful source units and the surrounding context. It keeps the locations of qualifying files even when it cannot confidently return an excerpt, and it does not force every search into a fixed top-two list.
The output order is described clearly: a summary and a compact file list come first, followed by selected source with line references, then detailed declaration and call locations. Declaration parsing supports Python, TypeScript and JavaScript, Go and Rust; extensionless Python and Node scripts are recognised by their shebang; other text uses a fallback.
The README stresses that the output is evidence for the agent to use, not a generated answer, and not a guarantee that every relevant file was found. This is a modest and worthwhile claim: the agent still has to judge, open more files and verify before editing code.
Installation, the skill and system requirements
The README requires Node.js 22+, macOS, Linux or Windows, and a key for one of these providers: Vercel AI Gateway, TypeSafe, OpenRouter, OpenCode Zen or a custom TypeSafe-compatible endpoint. No separate Python, Bun or ripgrep installation is needed to use jg.
An easily missed detail is that the README marks installing the agent skill as required for agent setup. Installing the CLI alone does not teach the coding agent to use it. You run the skill installer from the project where your agent works; it detects coding agents such as Claude Code, Codex, OpenCode and others, then asks where to install. You can add the global flag for a user-wide install, or the yes flag for unattended installation.
The skill explains installation, invocation and the meaning of the returned context, but leaves research and implementation decisions to the calling agent. The current repository skill checks for jg and installs the CLI if it is missing; authentication still needs your selected provider's key, and the skill installer does not configure credentials. The jg skill command installs the skill from the repository's main branch using a pinned skills CLI with npm lifecycle scripts disabled, and needs Node 22.20+, npm or npx and network access. Rerun it to get the current skill without waiting for a new npm release.
Upgrading and managing local state
The README says there is currently no jg upgrade command. To upgrade the CLI you use npm. After updating the CLI, rerun jg skill to refresh the installed skill, because updating the npm package does not overwrite skill files in your projects. The installer records the GitHub source and skill path in skills-lock.json, so you can rerun it on another machine or after changing your Node installation.
For authentication, the jg auth command asks for your provider and then saves its key in an owner-only config file. Re-running auth replaces the earlier setup, and searches always use the saved provider. The jg doctor command checks the setup with synthetic input. Existing saved keys without a provider remain Vercel keys. Environment-based credentials and endpoint overrides are no longer used, so anyone who relied on them needs to run auth again.
Evaluation answers are cached locally by default. The CLI writes its output to stdout and does not create report files. The README points to the help flag for cache controls, search overrides and incomplete-result behavior.
Using it in an AI agent workflow
In a coding agent workflow, jg plays the orientation step at the start of a task. Instead of letting the agent fire off many listing and file-reading commands to find its way, the agent asks one natural-language question about the behavior it needs to understand, receives relevant files and excerpts, and then continues its own work: implementing the change and running tests. The README is explicit that research and implementation decisions remain with the calling agent.
Because the skill is installed into agents such as Claude Code, Codex or OpenCode, integration does not require you to write your own prompt: the skill guides the agent on when to call jg and how to interpret its output. The installed skill is the same public skill the author used in the cost comparison.
The README also provides the jg files command, which counts the files a search under a chosen root may read, grouped by top-level directory, with no provider key or network request. It takes the same filtering flags as search, so it is a cheap way to check beforehand what scope would be sent.
Measurements published by the author
The figures below are the author's own claims from the README and have not been independently verified. In the ten-task SWE-bench comparison, Jevgrep completed the same 8 of 10 tasks as the no-Jev baseline, at lower cost. Full Sol cost fell from $7.62 to $5.44, a measured reduction of 28.6%, rounded to roughly 30%, including failed attempts and excluding Jev cost.
The README spells out the limits of the comparison: ten tuned Python SWE-bench tasks, one frozen installed package and the exact public skill in the repository. It measures task success and cost, not a speed improvement, and not guaranteed savings on every repository. A separate speed study measures later local optimizations with Jev's native TypeSafe endpoint.
The 0.4.3 total-cost rerun, including Jev, measured 25.8% lower total cost with the same 8/10 tasks solved; the older ~30% graphic reports Sol-only cost. The 0.5.0 evaluation retained 8/10 solves while reducing native Jev cost by about 59% versus that 0.4.3 run, and combined Sol-plus-Jev cost was 2–3% higher, which the author accepted as a small tradeoff for that release. The README cautions that these single-run observations do not establish statistical equivalence or a speed improvement.
Data sent, sensitive content and limits
The part most worth reading carefully is privacy. The README says searches send eligible source content to Jev through the provider selected during auth. Default filesystem filtering respects ignore files and excludes hidden files, dependency and build directories, binary files and obvious credential files, including .env variants and any path component whose name ends in .env.
In addition, a whole file is excluded as sensitive_content if its text matches a conservative credential heuristic: a known provider token prefix such as npm_ or glpat-, a Slack webhook URL, or a credential-shaped assignment with a long, high-entropy value. UUID-shaped identifiers are excluded from the entropy signal. The README states plainly that this is best-effort detection, not redaction or a guarantee that all sensitive information has been removed, so you must choose a search root you are willing to send.
There is an include-sensitive flag for when a search must include sensitive names, private-key markers and content-level matches, and an exclude flag taking a gitignore-style pattern relative to the root to skip paths for a single search. Other limits: you need a key from an external provider, declaration coverage is limited to Python, TypeScript, JavaScript, Go and Rust, and the results are evidence only, with no guarantee that every relevant file is found.
When to use it and when not to
Jevgrep fits if your coding agents often work in large or unfamiliar repositories, where locating the right files takes a noticeable share of the effort, and you accept sending eligible source content to an external provider. The author's figures suggest a cost benefit, but you should measure it on your own repository.
Reconsider if your source code must not leave the machine, if you only need to look up a known symbol or path, or if you expect a speed improvement, since the README says its measurements do not demonstrate that. Counting Jev cost also matters when comparing: the 28.6% figure excludes Jev cost.
In short, this is a small tool focused on one job: locating context for coding agents. The README does not discuss performance on very large repositories or languages beyond the list it names, so try it on your own data before putting it into your main workflow.
Written automatically by AI from the repo's README and GitHub API data, with automated checks but no human review of every sentence. Report mistakes by email.